Summary Sheet for Users
Last Updated October 6, 2022
ABOUT THE PROGRAM
Research Core Labs administers the Rees Scientific Freezer Monitoring System as of October 2022. This project was initially funded through Facilities Management. Calibration/validation was funded by Division of Research in 2021 along with the addition of 10 monitors (installed in February 2022). Additional monitors can be added by researchers at any time with their own funds.
This summary is a general overview of the program. This program is very robust and can do more than is summarized here. Please explore the system and utilize all the features of the program to suit your needs.
Important Disclaimer: Research Core is administering the system, but each lab is responsible for the monitoring of the freezers. This means, the lab contacts will receive notification (by email, phone, or both), and it's the lab's responsibility to respond to the alarm. Directions for accessing the system, responding to alarms, and more are provided in this document. If there is an issue with the freezer, PD or Facilities can be contacted to address the issue. Research Core is available for questions and to make sure the system is working properly. By using this system, you agree to these terms and take full responsibility to monitor your freezers.
PROGRAM ADMINISTRATORS
For questions regarding this program or to change settings, please contact the Research Core personnel below. Administrators can change freezer settings and contacts, create new users, change user passwords, troubleshoot, etc.
- Marcy Butler – Marcy.Butler@unthsc.edu
- Kishor Kunwar – Kishor.Kunwar@unthsc.edu
USING THE PROGRAM
Sign In: In order to access the program, you must be on campus or on the VPN (see remote access instructions here). In your browser, go to https://rees.intranet.unthsc.edu/. Each lab will only be able to see the monitors for your own units, and each person in the lab has their own login credentials. The user name will be the initial of your first name followed by your last name, and the default password is 1234. You will be prompted to change your password when you sign in for the first time (click “Change Password” after you sign in the first time and it will prompt you to change your password). If you forget your password, the program contacts (see above) can reset it. Each user has also been assigned a 4 digit pin number that has been provided to you. We can change the pin number at your request. This pin number will be used for telephoned alarms and to check the status of inputs on the telephone. Lastly, contact us if you need to add/delete users.
General Tour of the Program: When signing in, you should see circles under the building where your units are located. These circles represent each unit or input currently being monitored by the Rees System. The number in the circle is the “Input Number” of the unit. Each monitor on the system has a unique input number, and that number can be found on the Rees sticker on the freezer (typically located in the top right-hand corner on the freezer). Colors represent the following:
- Green – the input is within temperature range (status reads as “Normal”)
- Yellow - the alarm has either been inhibited (status reads as “Inhibited”) or the temperature is out of range, but the input is not in alarm (status reads as “Pending Alarm”). Alarms can be inhibited by the user for a period of time. For example, you can inhibit an alarm if the unit is down due to a repair. Every alarm is programed with a delay of 30 minutes which allows lab personnel to work in a freezer and let the freezer come back to temperature before the alarm sounds. This delay can be changed according to your needs by contacting the program administrators (see above).
- Orange – the monitor has lost connectivity (see below under “Resetting the Alarm”); (status reads as “Offline”)
- Red –the input is out of range and the alarm has been activated (status reads as “In Alarm”). In this case, you will be getting emails and phone calls to address the alarm.
Each person in the lab can inhibit and enable alarms, display settings and view reports. Setting changes such as temperature range and contacts must be made by the program administrators.
At the bottom of the screen, you will also see points 130 and 132-139. These points indicate the status of the data storage and the communication of the monitors. If you see any of these points as yellow, please contact us to address the situation.
Please note, the monitors must be physically plugged in to an outlet near the freezer. They are on battery backup, but they should be plugged in at all times to prevent the battery being drained. Batteries will be changed on an annual basis.
Settings: In order to change settings such as alarm limits and delay, email addresses, phone number, pin codes, and more, you must contact the program contacts (see above). You can quickly display settings by clicking on the input then clicking “Program Input”. You can then scroll through the various windows to display the settings. Please note, it is your responsibility to make sure these settings are accurate and up to date. Since the phone list cannot be displayed, it will be emailed to all users for verification.
Graphs and Reports: You can run and print various reports. Under the menu, you’ll see “Readings Reports”, “Averages Reports”, and “Readings Graphs”. The system collects data every 30 minutes when in normal range and every 5 minutes when an alarm is active.
Alarms - Email Notifications and Phone Calls:
The freezer monitor will go into alarm when the temperature is out of range after the 30-minute delay or the monitor has gone offline (lost connectivity). This means the color of the input will turn red, and you will start receiving emails and phone calls until the alarm has been inhibited or the temperature is back in range. Alarms can be inhibited through the system or by telephone. To inhibit the alarm through the system, click on the input then click “Manage Alarm”. You can inhibit the alarm for a short amount of time like 15 minutes and up to 9999 hours. This is where you’ll reset and enable the alarm as well.
- Emails – The email will be from freezeralerts@unthsc.edu. Please note, the system will send emails in order (to see your email settings, click on the input then click “Program Input” then “Email). There is a character limit, so if you provide multiple emails, they will be put in the system in the order you provide. If you have more email addresses, you can use a listserve email address. You’ll need to provide that email address to the program administrators.
- Phone Calls – You can inhibit the alarm through the telephone system as well as check the status of inputs. The instructions for phone calls is summarized below. If you would like to check on the status of an input, call 817-735-0203 and follow the steps. Please note, you will need your unique 4 digit pin number assigned to you for the telephone calls.
| What you hear | What you do | What is means |
| Centron Alarm. This is the Centron Monitoring System. | Listen | One of your inputs is in alarm. |
| Centron Node 1. Centron Alarm. | Listen | All of our inputs are under Node 1. |
| Input "X" Temperature is "Y". | Listen | For a particular monitor or probe, the temperature is as stated. |
| Repeat, This is the Centron Monitoring System | Listen | Repeats initial warning message 2 more times and afterwards hangs up and calls the next phone number. |
| Press “0” (zero) | This stops the calling sequence and acknowledges the alarm. | |
| Acknowledgement received. | Listen | This confirmation message tells you the system has recognized that you pressed "O" (zero). |
| Enter your telephone ID code followed by the “#” sign. | Enter your unique 4 digit pin # (ID code) followed by the “#” sign. | Identifies you and your security level to the system. Note: Your pin (ID code) is not the same as your username and password. This pin was given to each user by the system administrators. |
| Press "1" to check global status, '2" to check single input status, “3 to inhibit and input, “4” to enable an input, or “5” to hang up. | Press “1”, "2", "3", "4"o “5” | Allows you to check on the status of all inputs.
Allows you to hear the status of a single input Allows you to inhibit (turn off) an input. Allows you to turn an input back on. Hangs up the phone and disconnects you from the system. |
| Parameter | Press “3” and …. | This options tells the system you want to inhibit or silence an input. |
| Enter the input number followed by the '#" sign. To inhibit input "X", enter number of hours followed by the "#"sign. Use the "*" key for the decimal point." | "X" then "#"."X" then "#". | "X" = The probe number that is in alarm. "X" = Number of Hours. Use the "*" as a decimal point if you need it (i.e. 2 ½ hours = 2*5#). |
| Input "X" has been inhibited for _ ?_ Hrs. | Listen | Confirms the entered probe (input) number and number of hours it is turned off. |
| Press 1 to check global status, “2” to check single input status, “3” to inhibit an input, “4” to enable an input, “5” to hang up. | Press “5” then “#” or choose another option. | Pressing 5 and # will end current call. |
RESETTING THE MONITOR
If the monitor goes offline (the color changes to orange and the status reads “Offline”), it may need to be reset. Follow these instructions:
- Using a stepstool and adhering to good safety practices, locate the Rees communication box on top of the freezer (it’s a black box with the wires coming out of it).
- Rotate the lid off to see inside (only one screw is intact, so you can rotate it on and off). The following is what it will look like:
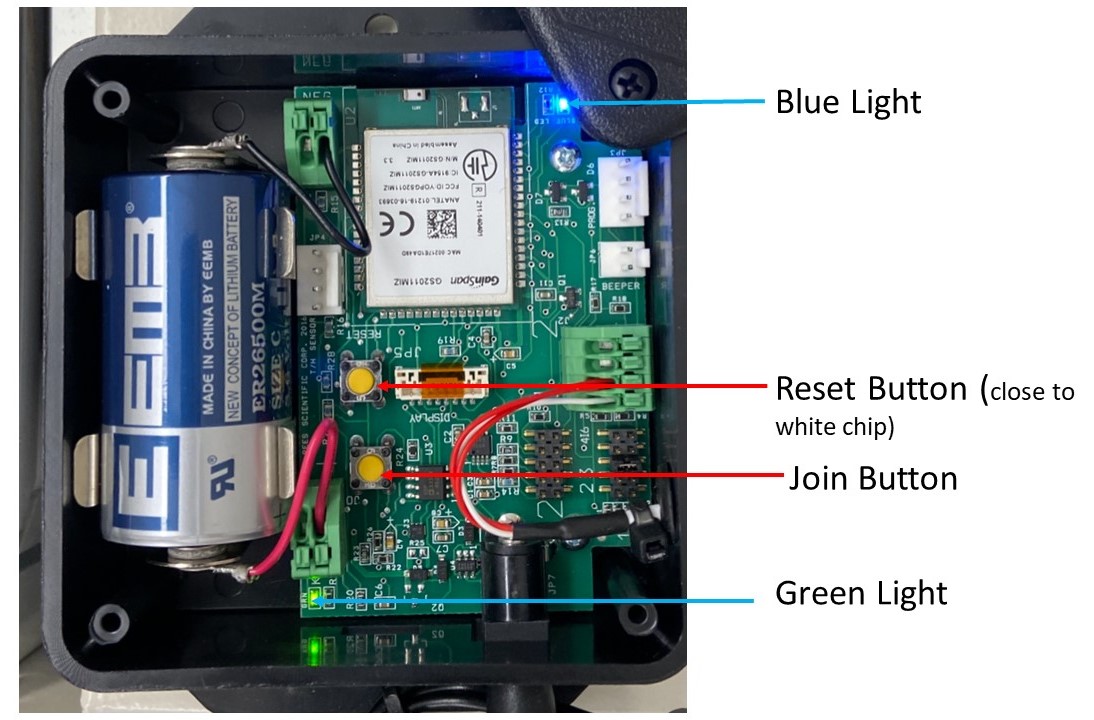
- First, Press and release Reset button and press and release Join button.
- The blue and green lights should be on.
- Check the program interface. The status should read “Normal” and the color will change back to green.
- If the above doesn’t work, perform the following steps:
- Unplug the black cord from the communication box then remove the battery.
- Wait about 5 minutes then put the battery back and plug it back in.
- First, Press and release Reset button and press and release Join button.
- If the monitor still doesn’t come back online, contact the administrators.